前言
在接觸 docker 的這三年中,從一開始的好奇和迷惘,到後來接受並享受了它的好處,途中經歷了一些不為人知的小困難,最近想寫這篇文慢慢回味並且分享一下我的 docker 學習心得,又因為我在 development + operation 方面的工作都有涉獵,更讓我對使用 docker 有不同的體會。
加入目前的公司 Umbo CV 兩年多來,對於裡面的大小夥伴們能夠一起接受並學習 docker 作為開發環境,並且部署到 production 系統,現在回想起來,著實讓人感到興奮,畢竟在當時,使用 docker 並且跑在 production 上面的公司,少之又少,即使到了現在,也是有些公司尚未 dockerize 他們重要的 components,而我們在當時就毅然決然的全面採用 docker,真的是一項不錯的投資。
Docker 解決了什麼呢?
這個問題讓我回想到大學時期當網管的時候,那時有一個很重要的任務,叫做電腦教室系統還原,印象深刻的是,我採用的高科技玩意叫做 Ghost,而把硬碟 mirror 後就會產生一個文件,我們稱它為映像檔 (image),最棒的地方在於,不管你在哪台電腦上面用這個 image 做還原,他就會跟原本的製作的環境一模一樣,這帶來的好處很明顯,就是我們只要透過網路,而不需要一台一台電腦用磁片重新安裝就能使他們回復到一樣的狀態。
回過頭來講到執行環境,不管對於使用者或是開發者來說,都是一個很困擾的問題,同樣的程式在不同的 OS, libarary下面執行,總是會有不同的執行結果和產生不同的臭蟲。舉個例子,在我的大學期末專題中,常常遇到不同人開發的程式,在其他人的電腦上面執行不了的問題,最慘的就是沒辦法在助教的電腦上面執行,而在當時筆記型電腦不盛行的時代,還需要人肉到助教的實驗室,借用電腦把程式修好。
再來到了雲端時代,在 AWS/Azure/GCP 上面有很方便的方法,幫忙你把既有的 VM 打成 image,可以很快地在不同的 instance type 上面做還原,然後個人電腦也有像是 virtualbox, vmware 加上 vagrant 去模擬不同的環境,打包好的 image 還有 config 也可以跟其他人互通有無,其實已經比以前方便非常多了!
而 docker 的橫空出世又是一個非常重要的里程碑,傳統的 VM solution 雖然是好棒棒,但是速度和體積來說真的是太大太肥,而開機的時間不管再怎麼壓縮,最快還是需要個 3~5 分鐘,當然這是相對 docker 而言,要不然 VM 已經是稱霸了好一陣子。 另外 docker 的出現真的是消弭了 development 和 operation 之間的環境差距,就像之前講的 developer 的環境有可能是自己安裝,或是使用 virtualbox 之類的工具,然後用 bash script/Makefile 或是寫進 Readme 文件裡面紀錄怎麼安裝,而負責 operation 的人也必須要花時間,看能不能成功裝在 AWS/Azure/GCP 這些 cloud provider 的 VM 上,這些工作常常需要耐心和時間,也常常因為版本的不同,導致 program 有不一樣的 behavior。

Docker vs VM
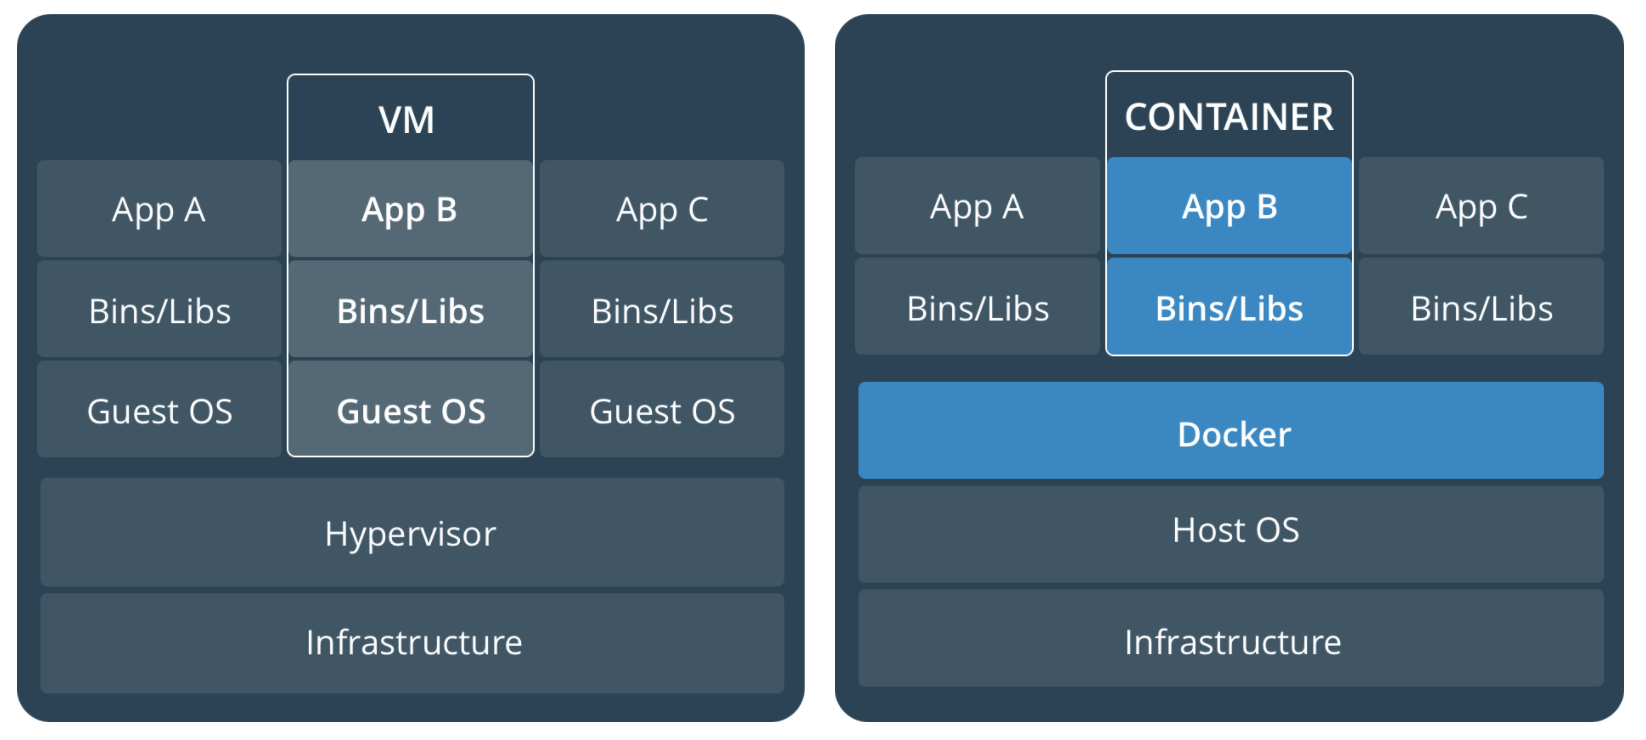
這張圖來自 docker 官網,基本上 Docker 會比 VM 輕量的原因就是因為少了一層 Guest OS,尤其在跑很多的 docker container 時,就少了 N 層的 Guest OS。
Basic Terminology
首先先看一下這張來自 docker 官網的圖,簡單闡述了 docker components 之間的關係。

- Imgaes: 是一個 read-only 的 template,其中包含了需要的 library & application,而當 containers 被執行起來的時候,這些 read-only 的 layers 會被共用。
- Container: 可以視為從 image 產生出來的 instance,而每個容器都有自己的 lifecycle,從出生到死亡每個 container 之間是互相隔離的。而有趣的是 image 是 read-only 的,但是 container 卻會在上面多加一層 writalbe 的 layer。
- Registry: 擺放 docker image 的倉庫。
- Dockerfile: 用來記錄構建 image 的 instructions。 (上面這張圖沒畫出來)
基本指令
這邊只會做個簡單紀錄,很多網路上的文章都有詳細介紹惹!
- 建構 docker image:
docker build --tag hello -f Dockerfile . - 列出 docker images:
docker images - 利用 docker image 去產生
docker container: docker run hello - 將 image 推到 docker registry:
docker push hello - 將 image 從 docker registry 下載:
docker pull hello
建構 docker image w/ Dockerfile
dockerfile 是拿來建構 image 的 file,而最基本的 Dockerfile 可以寫成下面這樣
1 | FROM busybox |
然後使用指令 docker build -t hello:v1 -f Dockerfile . 來建構我們的 image
build context
build context 的概念也是需要知道的一件事,會加速我們建構 docker image 的時間,而 context 可以是本地端的目錄或是遠端的 URL,而 docker 在 build stage 時,其實是把 context 傳進 docker daemon,然後透過 docker daemon 來 build image,而上面的指令可以視為 docker build -t hello:v1 -f Dockerfile context。
我們可以使用 .dockerignore 去定義哪些檔案不需要傳入 docker daemon,基本上在 build 時,會看到一個訊息像是 Sending build context to Docker daemon 142.5MB 就可以知道 build context 有多大。
multistage build
在 Docker 17.05 後,就可以使用 multistage build 去減少 docker image 的大小,以往我們因為要建構不同需求的 image 需要準備不同的 Dockerfile,像是
- 有安裝 Build tool chain 的 docker image
專門跑 production application 的 image
1
2
3
4
5
6
7
8
9
10
11
12
13
14
15
16
17
18# ---- Build ----
FROM python:3 as build
COPY requirements.txt .
RUN pip install -r requirements.txt
#
#---- Test ----
## run test
FROM build as test
RUN pip install pylint && \
pip install pytest
#
#---- Release ----
FROM python:3-alpine
COPY --from=build /root/.cache /root/.cache
COPY --from=build requirements.txt .
RUN pip install -r requirements.txt && rm -rf /root/.cache
而有了 multi-stage build 就可以利用一個 Dockerfile build 出不同 stage 的 image,例如
docker build --target build -t builder-stage -f Dockerfile .docker build --target test -t test -f Dockerfile .docker build -t release -f Dockerfile .
然後可以看到最後要 release 的版本,我們是利用 alpine,足足可以省下好幾百 mb 的空間。
Optimization && Debugging skill
docker image 最佳化的部分,不免是減少 layer,將一些垃圾砍掉,但是有了 multistage build 之後,其實改善的空間更大,而很多其實參考官網文件也有寫到。
Debugging skill 的部分,我想很值得一提,以往我們常常在 build image 的時候,可能會有一些 package conflict 或是有些 library 裝不起來,但是一直使用 docker build 試誤也是很煩人的事情,舉個例子,如果上面的那個範例不小心打成
1 | # |
少了 && \ 會看到下列錯誤訊息
1 | Sending build context to Docker daemon 2.56kB |
這時候其實可以使用指令 docker run -ti --rm 9b432c1c82e4 bash 登入 intermediate layer 來 debug,這個技巧在實務上面蠻需要的。
Development environment revolution
重朔 Development environment ,我認為是 docker 對 developer 來說最大的改變,就如我之前講的 developer 寫好的 code ,常常離實際的 production 環境有段距離,更別說現在有些採用 microservice 架構的應用,更是難以在本機建構一模一樣的環境做測試,以下會介紹一下我們 project 的 layout,加上如何採用 docker 來建構開發環境。
以下是 project layout,可以看到我們會擺放 Dockerfile,還有會放一個 enter_dev_env.sh 的 bash script 以供 developer 快速啟動 docker 的開發環境。
1 | . |
enter_dev_env.sh 的內容
1 | #!/bin/bash -xe |
通過這個 file 可以讓全部的開發者,擁有一樣的開發環境,也可以自行修改 $BASE_IMAGE 使用不同的版本和自己建構的 base image,也可以中途離開 container 後,使用同樣這個 script 在登入,接著接續上次的工作。然後
1 | docker run --name=$CONTAINER --hostname=$CONTAINER -ti \ |
這段是將 base image 跑起來的指令,這邊大家可以自行調整,除了 application 的目錄外,我還習慣把 aws & ssh key 給掛進去以方便開發。
待續
這篇文章打到這邊也有點手軟惹,接下來如果有機會,想要把如何使用 docker-compose 做 integration test ,還有搭配 Jenkinsfile 的部署流程分享一下。